
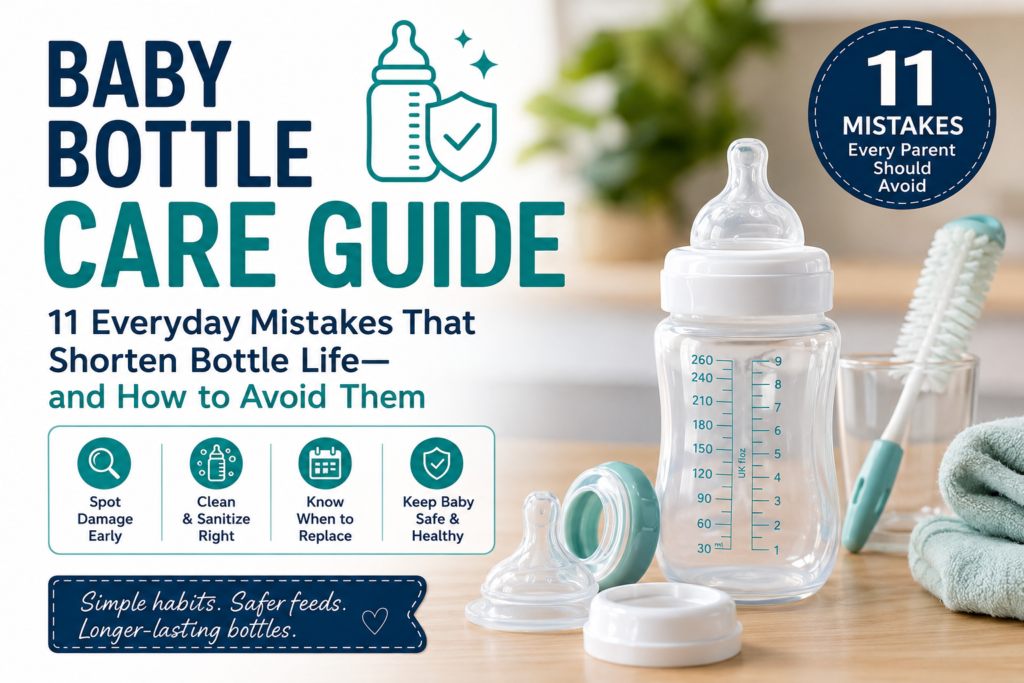
Baby bottles are designed for repeated use, but they do not stay in perfect condition forever. Every feeding, washing cycle, sterilizing session and trip inside a diaper bag places a little more stress on the bottle and its smaller parts.
I learned this after noticing that one bottle in our collection had become cloudy much faster than the others. Its measurement lines were harder to read, the collar leaked occasionally, and the nipple felt softer. The bottle was not especially old. It had simply been used and washed far more often than the rest.
That experience changed the way I looked after feeding equipment. Instead of waiting for a bottle to crack or stop working, I began checking the entire system: bottle body, nipple, collar, cap, valve and vent.
This guide explains the everyday habits that can shorten baby bottle life, the early warning signs parents often miss and the practical steps that make bottle care safer and easier.
Quick answer: What damages baby bottles most?
Baby bottles usually wear out because of repeated heat exposure, rough cleaning, trapped moisture, dried milk residue, uneven use and damage to individual components.
There is no universal replacement date that applies to every bottle. A lightly used glass bottle may remain in good condition much longer than a plastic bottle used several times a day. The bottle’s condition and the manufacturer’s instructions matter more than an arbitrary timeline.
Replace a bottle or part when it is cracked, chipped, torn, warped, sticky, badly scratched, difficult to clean or no longer seals and functions correctly.
Cleaning and sanitizing are not the same thing
Before discussing bottle-care mistakes, it helps to separate two steps that are often confused.
Cleaning removes milk, formula and visible residue using water, soap and physical washing. Sanitizing or sterilizing provides an additional germ-reduction step after the equipment has already been cleaned.
The CDC advises cleaning bottles after every feeding and taking apart all components before washing. It recommends daily sanitizing for babies younger than two months, babies born prematurely and babies with weakened immune systems. For older, healthy babies, daily sanitizing may not be necessary when equipment is cleaned carefully after every use.
UK guidance is more cautious. The NHS recommends sterilizing bottles, nipples and other feeding equipment until a baby is at least 12 months old. Parents should therefore follow the guidance used in their country, their child’s healthcare professional and the bottle manufacturer rather than relying on a general blog rule.
1. Using the same bottle for almost every feed
Many babies develop a preference for a particular bottle or nipple shape. Once parents find something that works, they naturally reach for it repeatedly.
The problem is not the bottle itself. It is the uneven workload.
A favourite bottle may be filled, warmed, washed, sanitized and dried five or six times in one day, while three identical bottles remain in the cupboard. Unsurprisingly, the heavily used bottle begins to look older first.
It may develop faded markings, a cloudy appearance, a loose collar or a nipple that flows differently.
What to do instead
Create a simple rotation. Number the bottles discreetly on the base or place clean bottles at the back of the storage area and take the next one from the front.
Rotation does not make bottles permanent, but it distributes washing, heat and handling more evenly. It also makes unusual wear easier to identify because you can compare bottles purchased at the same time.
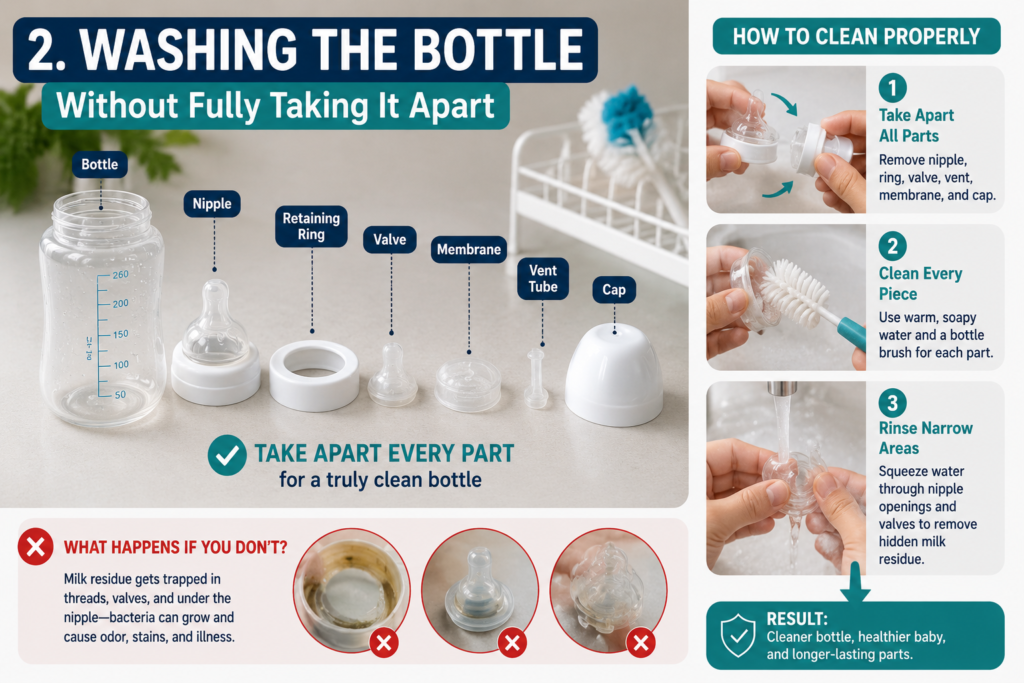
2. Washing the bottle without fully taking it apart
A bottle may look simple, but anti-colic models can contain several hidden components. Depending on the design, there may be a nipple, retaining ring, valve, membrane, vent tube, sealing disc and cap.
Rinsing the assembled bottle can leave milk inside threads, valves or the underside of the nipple.
The CDC recommends separating all parts before cleaning, including nipples, caps, rings and valves. It also advises squeezing water through nipple openings so those narrow areas are properly cleaned.
What to do instead
Disassemble the bottle immediately after use. Place the smaller components in a dedicated wash basin or closed dishwasher basket so they are not lost.
For complicated anti-colic systems, keep the manufacturer’s assembly diagram nearby until the cleaning routine becomes familiar.
3. Leaving milk in the bottle until it dries
A half-finished bottle beside the bed is familiar to most tired parents. The problem begins when leftover milk repeatedly sits long enough to form a film.
Dried formula and milk fats are harder to remove than fresh residue. Parents then compensate by soaking bottles for hours or scrubbing them aggressively.
The CDC advises cleaning bottles after every feed. It also says unfinished formula should be discarded when a baby has not finished it within two hours because germs can multiply when formula or breast milk is added to a partially used bottle.
What to do instead
Discard leftover milk according to safe-storage guidance and rinse the bottle promptly with running water. A quick rinse is not a substitute for washing, but it prevents residue from drying while you attend to the baby.
4. Scrubbing harder when soaking would work better
A rough kitchen sponge or abrasive pad may remove stubborn film quickly, but it can also scratch plastic.
Once the inner surface is visibly scratched, residue may become more difficult to remove. The bottle can enter a cycle of rougher cleaning followed by further surface damage.
Official guidance recommends using a clean bottle brush reserved for infant feeding items rather than a general kitchen scrubber. The CDC also advises using a separate wash basin rather than placing bottle parts directly in the sink, where contamination can occur.
What to do instead
Rinse early, soak briefly in hot soapy water and clean with a soft bottle brush. Replace the brush if its bristles become bent, dirty or difficult to rinse.
Do not use salt to scrub nipples. NHS guidance specifically warns against using salt to clean teats.
5. Assuming sanitizing can replace washing
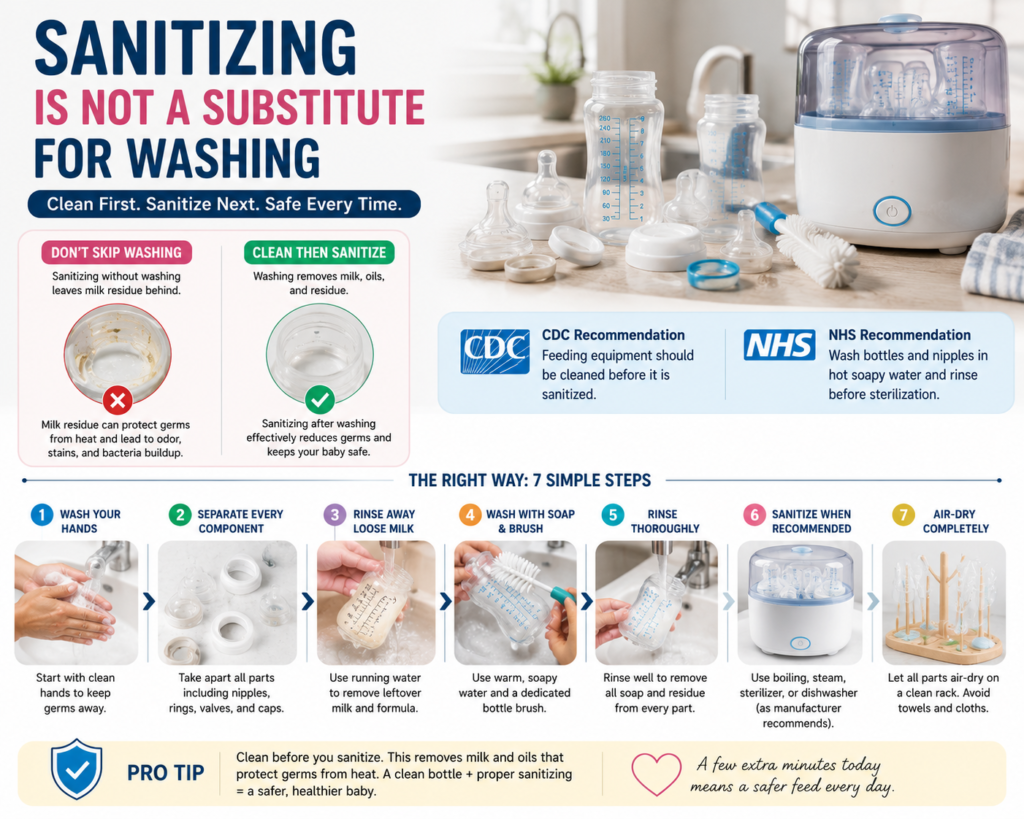
Steam, boiling or a sanitizing dishwasher cycle does not remove every layer of dried milk by itself. Heat should not be used as a shortcut for proper cleaning.
The CDC says feeding equipment should be cleaned before it is sanitized. The NHS likewise recommends washing bottles and nipples in hot soapy water and rinsing them before sterilization.
What to do instead
Follow this order:
- Wash your hands.
- Separate every bottle component.
- Rinse away loose milk.
- Wash with soap and a dedicated brush.
- Rinse thoroughly.
- Sanitize when recommended.
- Allow every part to air-dry completely.
This sequence protects hygiene more effectively than repeatedly steaming a bottle that still contains residue.
6. Using a heat method the bottle is not designed to tolerate
Different bottles use different materials. Common examples include glass, polypropylene, silicone and speciality plastics such as PPSU. A method suitable for one bottle may not be approved for another.
Boiling, microwave steam systems and electric sterilizers must therefore be used according to the product instructions. The CDC and NHS both advise checking manufacturer directions before choosing a sanitizing method.
The NHS also notes that nipples tend to become damaged faster when boiling is used.
What to do instead
Check the symbols and care instructions that came with the bottle. Confirm whether the bottle, nipple, valve and cap are individually safe for boiling, microwave use or the dishwasher.
Do not assume every component has the same heat tolerance simply because it belongs to the same bottle.
7. Placing small parts loosely in the dishwasher
A dishwasher can be convenient, but nipples, valves and sealing discs may fall onto heating elements or become trapped in the filter.
The CDC recommends placing small bottle parts in a closed-top basket or mesh bag. When the equipment is dishwasher-safe, a hot-water cycle with heated drying or a sanitizing setting can provide additional germ reduction.
What to do instead
Use the top rack unless the manufacturer states otherwise. Place small parts in a secure basket, position bottles so water can drain and inspect every component after the cycle.
A dishwasher can only clean surfaces the water reaches. A nipple folded under a ring or a valve trapped inside another part may need to be washed again.
8. Drying bottles with a used kitchen towel
A bottle may be clean when it leaves the wash basin, but drying it with a shared dish towel can transfer germs back onto the surface.
The CDC recommends placing cleaned components on a clean, unused towel or paper towel and allowing them to air-dry completely. It advises against rubbing or patting them dry with a dish towel.
What to do instead
Create a feeding-equipment drying area away from food preparation, splashes and household dishes.
Leave space between parts so air can circulate. Check nipples, valves and bottle bases carefully because water often hides in narrow edges.
9. Storing bottles before every part is dry
Putting a cap on a damp bottle feels tidy, but trapped moisture creates an avoidable hygiene problem.
The CDC advises allowing bottles, brushes and wash basins to dry thoroughly before storage to help prevent germ and mould growth. It recommends keeping clean, dry feeding items in a protected area such as a closed cabinet.
What to do instead
Do not reassemble bottles until all parts are dry. Store them away from the cooker, sink, direct sunlight and strong cleaning chemicals.
Clean the drying rack regularly too. A rack that stays wet underneath may contaminate the equipment it is meant to protect.
10. Blaming the bottle when only one part is worn
A leaking bottle does not always require full replacement.
The problem may be a stretched nipple, damaged valve, incorrectly seated sealing disc, worn collar or component assembled in the wrong order.
Before throwing the complete bottle away, compare it with another bottle from the same set. Swap one compatible part at a time to identify the failure.
Replace only the affected part when:
- the bottle body is undamaged;
- measurement markings are still clear;
- the neck and threads are intact;
- a new genuine nipple or valve restores normal performance.
Replace the complete bottle when:
- the body is cracked, chipped or warped;
- plastic has deep internal scratches;
- the bottle remains cloudy or smells unusual after proper cleaning;
- the neck is damaged and no longer holds the collar securely;
- printed measurements are too faded for accurate formula preparation.
Parents using Philips Avent bottles can also link here to the Philips Avent Natural Glass Baby Bottles Review on GetBabyInfo for a closer look at glass construction, nipple design and everyday usability.
11. Waiting for a dramatic failure before inspecting bottles
Most bottles do not suddenly fail without warning. They usually show smaller signs first.
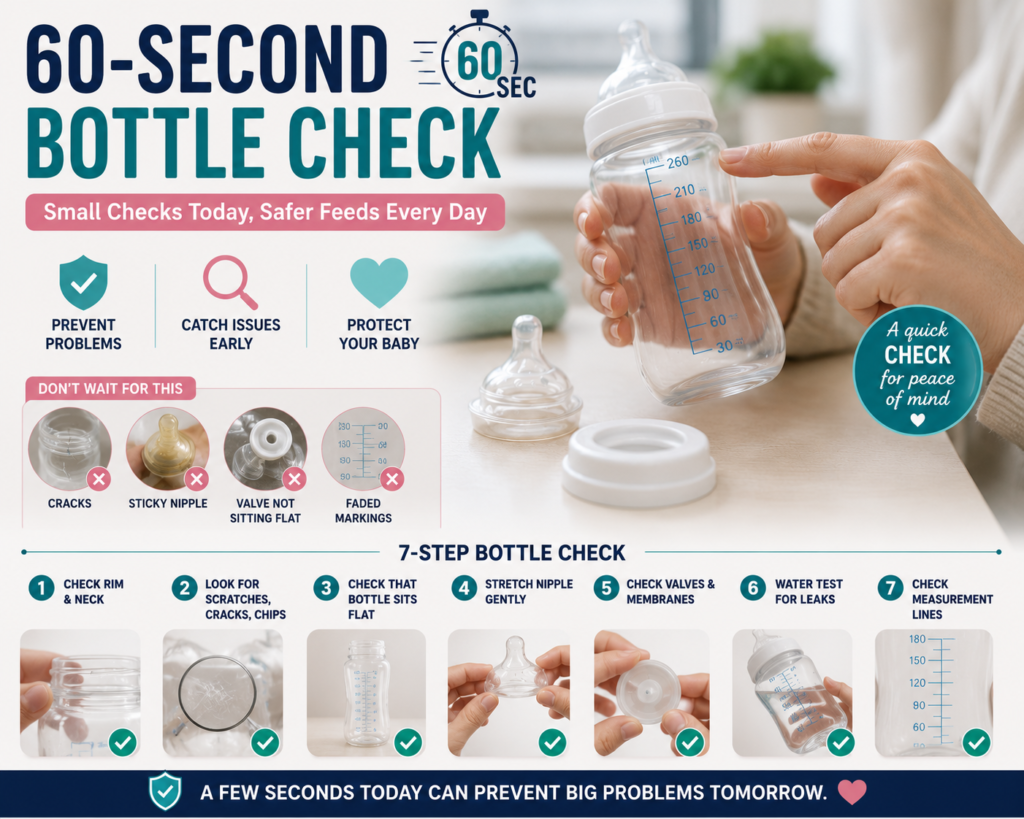
A nipple may become sticky. A valve may stop sitting flat. The bottle may begin leaking only when tilted. Measurement markings may slowly fade.
The NHS advises checking bottles and nipples for tears, cracks and other damage before sterilizing.
The 60-second bottle check
Once a week, inspect each bottle under bright light:
- Run a clean finger around the rim and neck.
- Look for deep scratches, cracks or chips.
- Check that the bottle sits flat.
- Stretch the nipple gently and look for tears.
- Confirm that valves and membranes return to their original shape.
- Fill the bottle with water, assemble it and check for leaks.
- Make sure measurement lines remain easy to read.
This short check is more useful than relying on a fixed replacement date.
Let the bottle’s condition, performance and manufacturer’s instructions guide the decision.
Final thoughts
The best baby bottle is not necessarily the bottle with the highest price or the longest list of features. It is the one that suits your baby, can be cleaned properly and remains in good condition through regular use.
Good bottle care comes down to a few realistic habits: separate every part, clean promptly, use suitable tools, follow the correct sanitizing guidance, let everything dry and inspect the whole system regularly.
You do not need to replace a perfectly good bottle simply because several months have passed. At the same time, you should not keep a damaged bottle only because it has not reached a suggested replacement date.
Frequently asked questions
How often should baby bottles be replaced?
There is no single evidence-based schedule for every bottle. Replace bottles according to their condition and the manufacturer’s guidance. Daily-use plastic bottles may show wear sooner than glass bottles, while nipples and valves often require replacement before the bottle body.
Is a cloudy plastic baby bottle unsafe?
Cloudiness can result from mineral deposits, detergent residue or surface wear. First clean the bottle according to its instructions. Replace it when cloudiness is accompanied by deep scratches, warping, persistent odour or a surface that no longer cleans properly.
Can baby bottles go in the dishwasher?
They can when the manufacturer labels them dishwasher-safe. Separate all parts, secure small pieces in a closed basket and position bottles so water can reach and drain from them.
Do bottles need to be sterilized after every use?
Guidance varies. The CDC prioritizes daily sanitizing for babies under two months, premature babies and babies with weakened immune systems, while the NHS recommends sterilizing feeding equipment until at least 12 months. Follow local health guidance, medical advice and product instructions.
Can I reuse bottles for another baby?
Undamaged bottle bodies may be reusable after thorough cleaning and inspection. Replace nipples, valves or seals that are old, sticky, torn, discoloured or misshapen. Do not reuse bottles with cracks, chips, deep scratches or unreadable measurement markings.
Should I worry about BPA in modern baby bottles?
In the United States, FDA regulations were amended in 2012 to remove authorization for BPA-based polycarbonate resins in baby bottles and sippy cups after manufacturers had already abandoned their use. Parents should still buy bottles from reputable sellers and check current product labelling.