18 min readUpdated October 23, 2026
What this guide covers
- Quick Answer: Why Do Baby Bottles Look Cloudy After Washing?
- First, Look Closely at the Cloudy Areas
- 1. Hard Water Is Leaving a White Film
- 2. Milk Fat Is Leaving a Thin Coating Inside
- 3. Dishwasher Deposits Are Making the Bottle Look Foggy
- 4. Tiny Scratches Are Making the Plastic Look Dull
- 5. Repeated Heat Exposure May Affect the Bottle
- 6. The Bottle Material Is Beginning to Show Wear
- 7. Dried Formula Is Creating Stubborn Residue
- 8. Water Droplets and Drying Conditions Are Making Cloudiness More Noticeable
- How to Remove Cloudiness From Baby Bottles Without Damaging Them
- Is a Cloudy Baby Bottle Safe to Use?
- A practical replacement guide
- Cloudy Plastic vs Glass Baby Bottles: What’s the Difference?
- Can Vinegar Remove White Cloudiness From Baby Bottles?
- Does Baking Soda Help With Cloudy Baby Bottles?
- Why Does My Philips Avent Bottle Turn Cloudy?
- Why Do Baby Bottles Turn Cloudy but Still Feel Smooth?
- Why Is Only One Baby Bottle Cloudy?
- How to Prevent Baby Bottles From Becoming Cloudy
- A Simple Weekly Bottle Check That Takes Five Minutes
- Frequently Asked Questions
- Final Thoughts: Don’t Judge a Baby Bottle by Its Cloudiness Alone
You finish washing your baby’s bottles, rinse them carefully, and place them on the drying rack. Everything looks clean.
But later, when you pick up a bottle, you notice something strange.
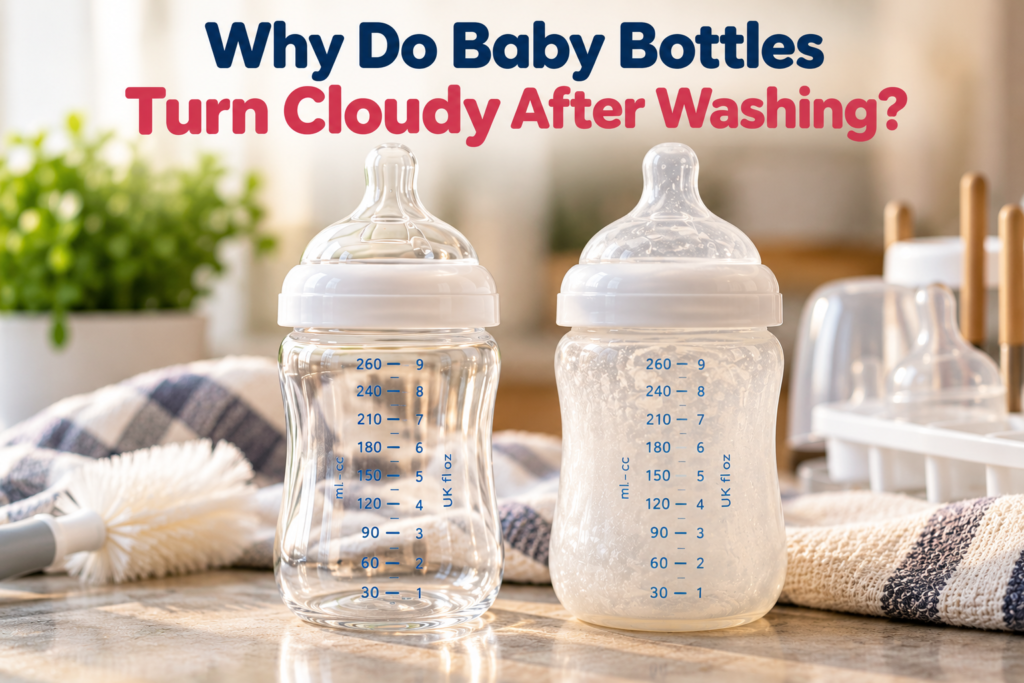
The clear plastic looks milky. There is a white film around the bottom, or the entire bottle seems slightly foggy.
You wash it again, expecting the cloudiness to disappear.
Sometimes it does. Sometimes it doesn’t.
And that’s when a simple cleaning problem becomes a bigger concern.
Is the bottle still safe for my baby? Am I washing it incorrectly? Do I need to buy new bottles?
These are reasonable questions, especially when you’re using the same bottles several times a day.
The reassuring part is that a cloudy appearance doesn’t always mean a bottle is dirty or damaged.
Sometimes the problem is as simple as minerals left behind by water. Other times, milk residue, dishwasher deposits, or tiny scratches may be responsible.
However, there are situations where replacing the bottle is the safer choice.
In this guide, we’ll look at eight reasons baby bottles become cloudy, how to identify different types of cloudiness, which cleaning methods are worth trying, and when it’s time to stop using a bottle.
Quick Answer: Why Do Baby Bottles Look Cloudy After Washing?
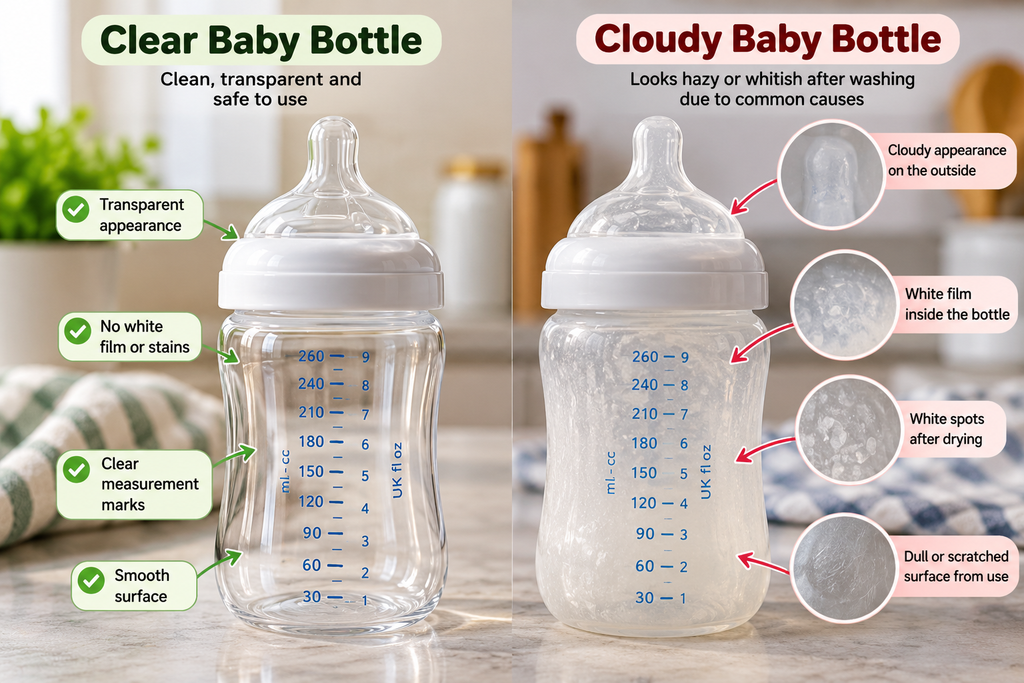
Baby bottles can turn cloudy because of hard-water deposits, milk fat, formula residue, detergent film, surface scratches, repeated heat exposure, or changes in the bottle material.
The most useful first step is to determine whether the cloudiness is a removable coating or a permanent change in the bottle’s surface.
A white film that disappears after proper cleaning is different from plastic that has become rough, scratched, or damaged.
If the bottle is cracked, warped, significantly scratched, or cannot be cleaned properly, replacing it is the better option.
One important thing to remember: A bottle doesn’t have to look perfectly transparent to be clean, but it must be properly washed and in good condition.
First, Look Closely at the Cloudy Areas
Before trying different cleaning products, examine the bottle in natural light.
You don’t need special equipment.
Hold the empty bottle near a window and slowly turn it.
Notice whether the cloudy appearance is concentrated in one area or spread across the entire surface.
Here are some useful clues.
| What You Notice | Possible Cause | First Thing to Check |
|---|---|---|
| White, chalky coating | Hard-water minerals | Check other washed glassware |
| Milky film inside the bottle | Milk fat or formula residue | Wash thoroughly with soap |
| Cloudiness after dishwasher use | Mineral or detergent deposits | Compare with handwashing |
| Fine lines across the plastic | Surface scratches | Inspect under bright light |
| White marks near the bottom | Dried milk or mineral deposits | Check whether marks wash away |
| Cloudiness after boiling | Mineral deposits or material changes | Check bottle condition |
| Permanent haze with roughness | Surface wear or deterioration | Consider replacement |
| Spots appearing only after drying | Water deposits | Check water hardness |
This simple inspection helps you avoid treating every cloudy bottle as the same problem.
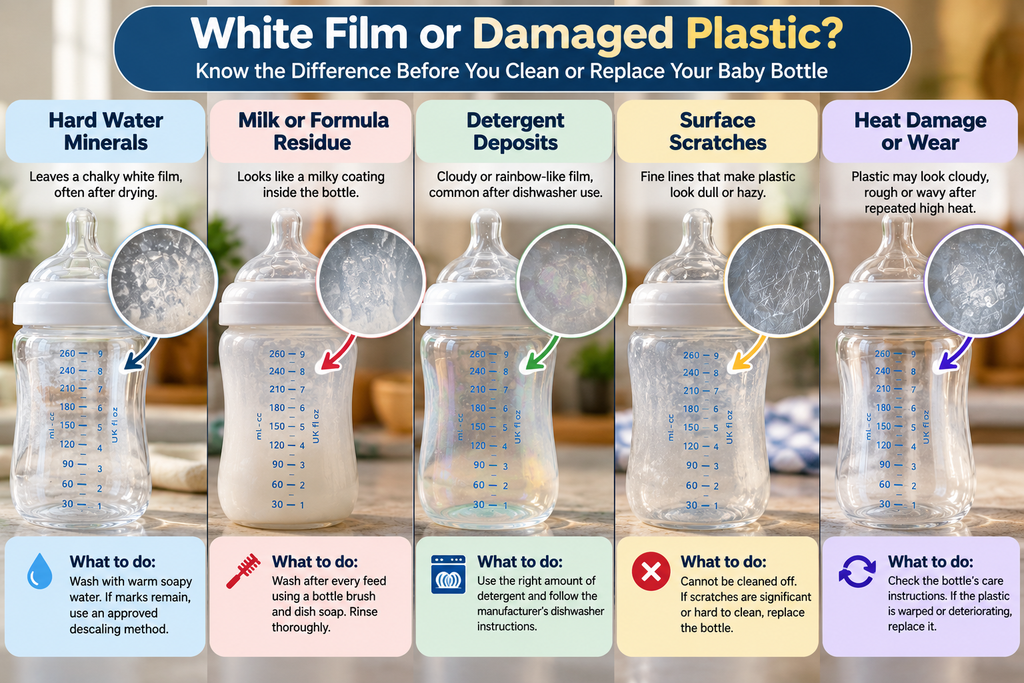
1. Hard Water Is Leaving a White Film
One of the most common explanations for cloudy-looking kitchen items is hard water.
Hard water contains dissolved minerals, particularly calcium and magnesium.
When water dries, some of those minerals can remain on the surface.
The result is a pale, chalky coating that may make a clear baby bottle look cloudy.
How can you recognize hard-water deposits?
Look around your kitchen.
Do drinking glasses sometimes develop white marks after washing?
Does your kettle have a chalky coating inside?
Do you notice white deposits around the faucet?
If you see similar marks on other household items, mineral deposits may explain the cloudiness on your baby’s bottles.
How to deal with it
Start with ordinary cleaning.
Wash the bottle using a suitable bottle brush, warm water, and dish soap.
Rinse it thoroughly and allow it to air-dry.
If the mineral film remains, check the manufacturer’s cleaning instructions before trying a descaling solution.
Some bottle manufacturers allow specific methods for removing mineral deposits. Others may have restrictions based on the material.
Don’t assume a cleaning method that works on a drinking glass is automatically suitable for a baby bottle.
This is particularly important for bottles with special coatings or multiple plastic components.
2. Milk Fat Is Leaving a Thin Coating Inside
Have you ever washed a greasy plate with plain water and noticed that it still feels slippery?
Something similar can happen with baby bottles.
Both breast milk and infant formula contain fat.
When milk sits inside a bottle, a thin layer of residue may remain on the surface.
If the bottle is only rinsed quickly, that residue may not be removed completely.
After drying, the inside can look dull or slightly cloudy.
Why this happens
Water alone isn’t always enough to remove fatty residue.
Dish soap helps loosen oils and other milk components so they can be washed away.
That’s why rinsing a used bottle is not the same as properly cleaning it.
What parents should do
Take the bottle apart after feeding.
Wash the bottle body, nipple, collar, cap, and any removable anti-colic components.
Use a clean basin reserved for infant feeding equipment and a dedicated bottle brush.
Pay attention to the bottom of the bottle and the area around the neck.
These spots can be easy to overlook during a busy day.
Rinse thoroughly and let the components air-dry completely.
A useful habit: Instead of checking only whether the bottle looks clear, inspect the inside for any visible film or residue before putting it away.
If a coating remains after proper cleaning, investigate further rather than simply rinsing the bottle again.
3. Dishwasher Deposits Are Making the Bottle Look Foggy
Dishwashers can save parents a lot of time.
But sometimes a bottle comes out looking cloudier than it did before washing.
This doesn’t necessarily mean the dishwasher has damaged it.
Minerals in the water, detergent deposits, and drying conditions may affect how the surface looks.
How to find out if your dishwasher is contributing
Try a simple comparison.
Take two bottles of the same type and condition.
Wash one by hand and the other using the manufacturer’s approved dishwasher method.
Allow both to dry completely.
Then compare them under the same lighting.
If the dishwasher-washed bottle repeatedly develops a removable film, the washing process may be contributing.
What should you check?
Make sure the bottle is dishwasher-safe.
Check whether you’re using the detergent correctly.
Follow the dishwasher manufacturer’s instructions for detergent quantity, loading, and water hardness.
Also check the bottle manufacturer’s recommended rack placement.
Some baby bottle components may be suitable only for the top rack.
Small parts should be secured in a suitable dishwasher basket where recommended.
Should you stop using the dishwasher?
Not automatically.
If your bottle manufacturer approves dishwasher cleaning, it can be a convenient option.
However, if the bottle begins showing permanent damage, changes in shape, or deterioration, stop using that bottle and review the cleaning method.
4. Tiny Scratches Are Making the Plastic Look Dull
Sometimes the cloudiness isn’t a coating at all.
It may be part of the bottle’s surface.
Plastic bottles can develop scratches through everyday use.
Some are visible immediately, while others are so fine that you notice them only when light hits the bottle at a certain angle.
These small surface marks scatter light, making transparent plastic appear hazy.
What can cause scratches?
Rough cleaning pads, abrasive powders, hard objects, and general wear can all contribute.
Scratches may become more noticeable after repeated washing.
How to check
Hold the clean, dry bottle under bright light.
Rotate it slowly.
Look for fine lines, rough patches, or dull areas that stay in the same position.
If the cloudiness remains unchanged after proper cleaning, it may be surface wear rather than residue.
Can you remove scratches?
Ordinary cleaning cannot reverse physical scratches.
Avoid polishing the inside of a baby bottle with toothpaste, abrasive powders, or rough sponges.
These methods can create additional damage.
If scratches are significant, especially if they make the surface difficult to clean, replace the bottle.
The goal isn’t to make an old bottle look new. It’s to make sure the bottle remains suitable for feeding.
5. Repeated Heat Exposure May Affect the Bottle
Many parents use boiling water, steam sterilizers, or dishwasher sanitizing cycles to care for baby bottles.
These methods can be appropriate when the bottle manufacturer permits them.
However, different bottle materials have different heat tolerances.
Excessive temperatures, incorrect sanitizing methods, or prolonged exposure beyond the manufacturer’s instructions may damage some components.
Why does a bottle look cloudy after sterilizing?
There are two possibilities worth considering.
First, mineral deposits.
If the water contains dissolved minerals, some may remain on the bottle after heating and drying.
This can produce a white film.
Second, changes in the material.
If the plastic has been exposed to unsuitable conditions, its surface or shape may change.
A permanently altered appearance, especially when accompanied by warping, roughness, or cracks, deserves attention.
What should parents do?
Check the bottle’s instructions before boiling or steam sanitizing.
Follow the recommended time and temperature.
Don’t leave bottles exposed to heat longer than instructed.
Inspect the bottle afterward.
If it becomes warped, cracked, or otherwise damaged, stop using it.
Remember that cloudiness after sterilizing does not automatically mean heat has damaged the bottle. Mineral deposits may be responsible.
6. The Bottle Material Is Beginning to Show Wear
Not every bottle stays perfectly clear throughout its useful life.
Plastic, glass, and silicone have different properties, and they may change in appearance in different ways.
A plastic bottle can develop surface scratches or discoloration.
Glass may develop mineral deposits or surface changes, although it doesn’t wear in exactly the same way as plastic.
Silicone components may also change in appearance over time.
Does cloudy plastic mean the bottle is unsafe?
Not necessarily.
A removable white coating is different from a damaged bottle surface.
But if the plastic is visibly deteriorating, that is a reason to stop using it.
Look for these warning signs
- Cracks or splits
- Significant scratches
- Warping
- Rough or damaged surfaces
- Damaged bottle threads
- Parts that no longer fit securely
- Other visible signs of deterioration
If you notice these changes, replacing the bottle is more sensible than continuing to experiment with cleaning products.
What about glass bottles?
Glass bottles can also become cloudy because of mineral deposits.
However, glass bottles require inspection for chips and cracks.
A chipped or cracked glass feeding bottle should be replaced.
If you’re comparing materials, our Philips Avent Natural Glass Baby Bottles Review can help you understand some of the practical differences.
7. Dried Formula Is Creating Stubborn Residue
Sometimes the problem starts long before washing.
Imagine finishing a feed and placing the bottle on the kitchen counter.
You plan to wash it in a few minutes, but the baby needs changing, the phone rings, and something else needs your attention.
By the time you return, the leftover milk has started drying inside.
This is a familiar kind of situation in a busy household.
As formula residue dries, it may become more difficult to remove from narrow areas.
A quick rinse may leave behind a visible film.
Where does residue collect?
Check the bottle bottom, neck, threads, and any removable anti-colic components.
These areas may need more attention than the main bottle body.
How to prevent the problem
Wash feeding equipment after every feed.
Take the components apart before cleaning.
Use a suitable brush to reach the inside surfaces.
Don’t rely on rinsing alone.
If residue has dried, follow the manufacturer’s recommended cleaning procedure.
Avoid scraping the inside with sharp objects or abrasive tools.
What if the residue doesn’t disappear?
If the bottle cannot be cleaned adequately using the approved method, replacing it may be necessary.
Don’t continue using a bottle with visible milk residue simply because it has been washed once.
8. Water Droplets and Drying Conditions Are Making Cloudiness More Noticeable
Have you noticed that a bottle sometimes looks clear while wet but develops white spots after drying?
This can happen when water evaporates and leaves minerals behind.
It doesn’t necessarily mean the bottle itself has changed.
However, drying is also an important part of proper bottle care.
Why complete drying matters
Moisture can remain inside bottles, nipples, and small components when they’re assembled or stored too soon.
This creates conditions that may support microbial growth.
A better drying routine
After washing, place the disassembled bottle parts on a clean, unused dish towel or paper towel in a protected area.
Allow them to air-dry completely.
Avoid rubbing the inside dry with a used kitchen towel.
Make sure the drying rack itself is cleaned regularly.
Only assemble and store the bottle once every component is dry.
For detailed cleaning and drying recommendations, parents can consult the CDC’s infant feeding equipment hygiene guidance.
How to Remove Cloudiness From Baby Bottles Without Damaging Them
Before trying a new cleaning product, follow this simple process.
Step 1: Empty and disassemble the bottle
Remove the nipple, collar, cap, and any other removable components.
Check that you’re following the correct instructions for your bottle model.
Step 2: Inspect the cloudy areas
Look for white deposits, greasy residue, scratches, or other changes.
Step 3: Wash with soap and water
Use a dedicated infant-feeding wash basin and bottle brush.
Clean every component according to its instructions.
Step 4: Rinse thoroughly
Remove loosened residue and soap using safe running water.
Step 5: Allow complete air-drying
Place the parts in a clean area and let them dry completely.
Step 6: Inspect the bottle again
If the cloudiness disappears, removable residue was likely involved.
If it remains, check for mineral deposits or permanent surface changes.
Step 7: Decide whether to keep or replace it
A structurally sound bottle with removable mineral deposits may not need replacing.
A cracked, warped, significantly scratched, or deteriorating bottle should be replaced.
Important: This process helps identify visible problems. It does not prove that a bottle is free from harmful germs or chemicals.
Is a Cloudy Baby Bottle Safe to Use?
This is probably the most important question in the entire guide.
The answer depends on the condition of the bottle.
A cloudy appearance caused by removable mineral deposits is not the same as damaged plastic.
However, a bottle that looks clear is not automatically hygienically clean either.
A practical replacement guide
| Bottle Condition | What Parents Should Do |
|---|---|
| White mineral film that washes away | Clean and inspect |
| Milk residue that washes away | Complete proper cleaning |
| Cloudiness without visible damage | Check manufacturer guidance |
| Significant scratches | Replace |
| Cracked or chipped bottle | Replace immediately |
| Warped plastic | Stop using and replace |
| Parts no longer fit securely | Replace affected components |
| Persistent residue that cannot be removed | Stop using and replace |
| Suspected material deterioration | Contact manufacturer or replace |
When you’re uncertain whether the material is damaged, choosing a replacement is usually more practical than trying stronger household cleaning products.
Cloudy Plastic vs Glass Baby Bottles: What’s the Difference?
Both plastic and glass bottles can develop cloudy appearances, but the reasons may differ.
Plastic baby bottles
Plastic may become cloudy because of mineral deposits, milk residue, fine scratches, or changes in the surface.
The condition of the plastic matters more than its transparency alone.
Glass baby bottles
Glass can develop white mineral deposits after washing.
It can also experience permanent surface changes under some conditions.
Inspect glass bottles carefully for cracks or chips.
Which material stays clear longer?
There isn’t a universal answer.
It depends on the material, water quality, cleaning method, and how the bottle is handled.
If you prefer glass bottles, choose a design that meets your needs and follow the manufacturer’s care instructions.
Can Vinegar Remove White Cloudiness From Baby Bottles?
Vinegar is often recommended online for removing hard-water deposits.
Because vinegar is acidic, it can dissolve certain mineral deposits.
However, not every baby bottle component should be soaked in vinegar.
Materials, valves, seals, and coatings may have different care requirements.
Before using vinegar, check whether the manufacturer specifically permits it and follow the approved dilution, contact time, and rinsing instructions.
Do not use vinegar as a substitute for washing or recommended sanitizing.
And never mix vinegar with bleach.
If the bottle’s instructions do not support a vinegar treatment, use the recommended cleaning method instead.
Does Baking Soda Help With Cloudy Baby Bottles?
Baking soda is another household product commonly suggested for cleaning.
However, it won’t repair scratches or reverse material deterioration.
Using it as an abrasive scrub may also damage some plastic surfaces.
For this reason, I wouldn’t recommend scrubbing baby bottles with baking soda unless the manufacturer approves the method.
A bottle with permanent surface damage needs inspection or replacement, not polishing.
Why Does My Philips Avent Bottle Turn Cloudy?
Philips Avent bottles are available in different materials and designs.
Some are plastic, while others are glass.
If your Avent bottle looks cloudy, first identify the exact model.
Check whether the cloudy appearance is caused by a removable white coating, milk residue, or visible surface wear.
What should you inspect?
Look at the bottle body, bottom, neck, and measurement markings.
Check for scratches or other damage.
Confirm that you’re using the recommended washing and sanitizing methods.
If the cloudiness remains and you’re concerned about the bottle material, consult Philips Avent support for your specific model.
You can also read our Philips Avent Natural Glass Baby Bottles Review to learn more about that bottle design.
Why Do Baby Bottles Turn Cloudy but Still Feel Smooth?
A smooth surface doesn’t necessarily mean the cloudiness is permanent.
Mineral deposits or thin residue may affect appearance without creating an obvious rough texture.
Likewise, some fine scratches may not be easy to feel.
The best approach is to clean the bottle properly, let it dry, and inspect it under good lighting.
If you’re unsure whether the surface has deteriorated, consult the manufacturer.
Why Is Only One Baby Bottle Cloudy?
This is an interesting clue.
If you wash several identical bottles using the same method but only one becomes cloudy, the difference may be related to that bottle’s condition or use.
Perhaps it has more surface wear.
Maybe milk residue dried inside it for longer.
Or it may have been exposed to different cleaning conditions.
Compare the bottles carefully.
Look for scratches, damaged areas, and removable deposits.
If the affected bottle has visible deterioration, replace it rather than assuming every bottle in the set has the same problem.
How to Prevent Baby Bottles From Becoming Cloudy
You can’t guarantee that a bottle will stay perfectly clear forever.
But these everyday habits can help maintain its condition.
Wash after every feeding. Don’t allow leftover milk to sit inside unnecessarily.
Use a suitable bottle brush. Avoid rough cleaning pads and abrasive scrubbing.
Take bottles apart. Clean the nipple, collar, cap, and removable valves separately.
Follow dishwasher instructions. Not every component is dishwasher-safe.
Use approved sanitizing methods. Follow the manufacturer’s temperature and time limits.
Rinse thoroughly. Remove loosened residue and soap.
Air-dry completely. Don’t store bottles while their components are still damp.
Inspect regularly. Look for scratches, cracks, warping, and other signs of wear.
These habits also help prevent other bottle problems.
For more practical tips, read our Baby Bottle Care Guide: 11 Everyday Mistakes Parents Should Avoid.
A Simple Weekly Bottle Check That Takes Five Minutes
Daily cleaning is essential, but a short weekly inspection can help you notice changes you might otherwise miss.
You don’t need a complicated routine.
Minute 1: Check the bottle body
Hold it near a window.
Look for scratches, cloudy patches, cracks, or changes in shape.
Minute 2: Inspect the bottom
Look for dried milk residue and white mineral deposits.
Minute 3: Check the neck and threads
Make sure there isn’t residue trapped around the opening.
Minute 4: Inspect nipples and valves
Look for tears, stickiness, thinning, or damage.
Minute 5: Check your cleaning tools
Make sure the bottle brush, wash basin, and drying area are clean and in good condition.
If you notice damage, replace the affected component.
This small routine can make bottle care easier without adding another complicated task to your day.
Frequently Asked Questions
1. Why are my baby bottles cloudy after sterilizing?
Cloudiness after sterilizing may come from mineral deposits in the water or changes in the bottle material. Check whether the film can be removed using an approved cleaning method. Replace bottles showing damage or deterioration.
2. Why do plastic baby bottles become white?
Plastic bottles may look white because of mineral deposits, dried milk residue, scratches, or surface changes. The cause depends on whether the white appearance is removable or permanent.
3. Can hard water make baby bottles cloudy?
Yes. Calcium and magnesium deposits can remain on surfaces after water evaporates, leaving a white or chalky film.
4. Are cloudy baby bottles dirty?
Not necessarily. Cloudiness may result from mineral deposits or surface wear. However, appearance alone cannot confirm cleanliness. Bottles still need proper washing after every feeding.
5. Why does my baby bottle remain cloudy after washing twice?
If proper washing doesn’t remove the cloudiness, it may be caused by mineral deposits that need an approved descaling method or by permanent surface changes such as scratches.
6. Can I use a cloudy baby bottle for my newborn?
The answer depends on why it is cloudy and whether the bottle is in good condition. A removable mineral film differs from damaged plastic. Follow newborn feeding-equipment hygiene recommendations and replace bottles that are damaged or cannot be cleaned properly.
7. Do glass baby bottles become cloudy?
Yes. Glass bottles can develop mineral deposits and sometimes permanent surface changes. Check for chips and cracks before use.
8. Should I throw away a cloudy Philips Avent bottle?
Not automatically. First check whether the cloudiness is removable residue or a sign of damage. Follow the care instructions for your exact Philips Avent model.
9. Can scratches make baby bottles look cloudy?
Yes. Fine scratches scatter light and can make transparent plastic appear dull or hazy. Significant scratches are a reason to replace the bottle.
10. How often should baby bottles be washed?
Baby bottles should be cleaned after every feeding. Daily sanitizing is particularly important for babies younger than two months, those born prematurely, and those with weakened immune systems. Follow your healthcare professional’s advice if your baby has additional medical needs.
Final Thoughts: Don’t Judge a Baby Bottle by Its Cloudiness Alone
Finding a cloudy baby bottle after washing can be frustrating.
You may wonder whether the bottle is still clean, whether your washing routine is causing the problem, or whether it’s time to buy replacements.
But cloudiness doesn’t always mean something is wrong.
Sometimes a white film comes from hard-water minerals.
Sometimes leftover milk fat or formula residue is responsible.
And sometimes the bottle’s surface has changed because of scratches or wear.
The important thing is learning to recognize the difference.
Start with proper cleaning. Let the bottle dry completely. Then inspect the surface.
If the cloudiness disappears, you’ve probably identified a removable residue.
If it remains, look more carefully for damage.
A baby bottle doesn’t need to look brand-new, but it should always be clean, undamaged, and suitable for feeding.
When in doubt about its condition, contact the manufacturer or replace it rather than taking unnecessary risks.
Trusted Sources
For parents who want to check official guidance:
1. CDC — How to Clean, Sanitize, and Store Infant Feeding Items
Provides practical instructions on cleaning, sanitizing, drying, and storing infant feeding equipment.
2. Philips Avent Official Website
Provides product information and access to model-specific care guidance.
3. NHS — Bottle Feeding Advice
Provides guidance on safe bottle feeding and related hygiene practices.